DIY
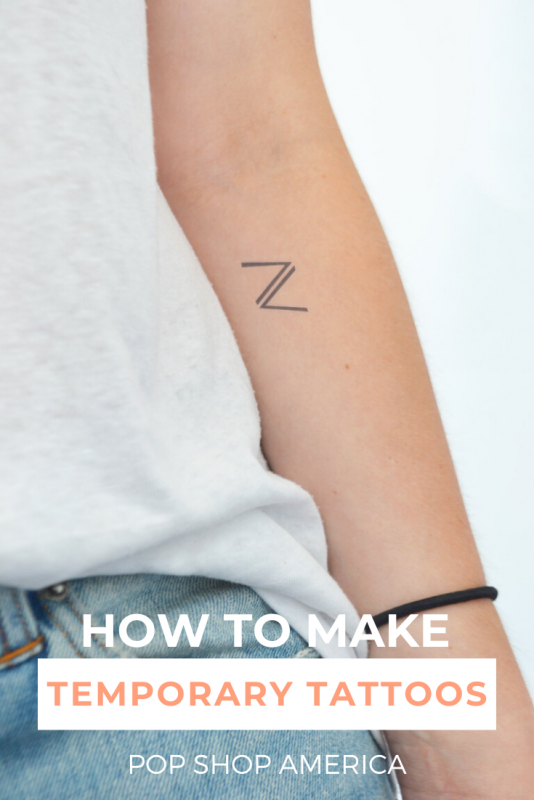
How to Make Your Own Custom Temporary Tattoos
Aug
I used to love getting temporary tattoos when I was a kid. Pretty sure I’m not alone in that. It was so much fun getting a whole pack of them and being able to pick which one you wanted. Bonus points if you got a cereal that came with a temporary tattoo. There was always the giddy anticipation of putting it on, along with the agonizing minute that you had to wait before you could peel it off and reveal the tattoo underneath. I was always thrilled when it came out perfect and my little hands didn’t somehow mess it up. It was fun being able to play around with the tattoos as a kid and have some temporary ink.
As an adult, I’ve wanted a real tattoo for quite a few years now. The only problem is, I’m horribly indecisive. This indecisiveness has lead to a number of different tattoo obsessions over the years. Some of them good, and some of them cringe worthy. I think it’s safe to say that I’ve settled on two that I want, but I’m still hesitant to actually get them. Side note: I’m horribly afraid of needles. So, there’s that.
In order to help solidify my decision, I decided to try doing some temporary tattoos just to see if I liked the look of them on me. There are actually a number of companies now that make temporary tattoos that last about 2 weeks! My friend told me about a company called Inkbox that is based right here in Toronto! They were having a sale so I scooped up this and this to try on my wrists.
Something else you should know about me is that I am rather impatient when I’m excited. In my excitement to use the tattoos, I didn’t properly follow the instructions. I should have had someone apply them for me instead of doing it myself. I had to reposition the sticker – which you’re not suppose to do! Plus, I tried to do two at once, so the first one started lifting off my skin as I bent my wrist to do the second.
They came out looking misshapen and quite frankly, awful. Given that I was the one to blame, I recently decided to come up with a solution.
I still had a good amount of ink left and wanted to try to make my own templates, as well as draw some free hand. With a failed attempt under my belt, I now knew what not to do, and hoped that this would make for a more successful round 2. The tattoos are actually really pretty when you do them properly! It’s also such a fun way to be creative or to test out a tattoo that you think you want!
Make sure that you put the tattoo in a place that will be easy for you to apply it. If it’s anywhere on the back of your body, it might be helpful to have a friend apply it for you!
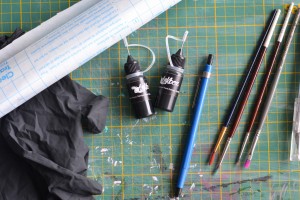
The ink for the temporary tattoos can be purchased here from the Inkbox website. Then, creating your templates is up to you! I used contact paper for my templates and the ink bottle for the freehand tattoos. Here’s how I did it:
DIY Custom Temporary Tattoos
Supplies:
- temporary tattoo ink
- gloves – the thin kind that you would wear for dying hair
- contact paper
- a ruler
- an exacto knife
- rubber cutting mat
- a pen
- design ideas (see my Inspire | Ink Pinterest board for some inspiration!)
Contact Paper Method:
- Decide on your design(s). The bigger the design, the more ink it will take. Also, be mindful of being able to create it into a template for your tattoo. Smaller tattoos work better with the contact paper – there is a smaller chance that the paper will detach from your skin. Also try to go for something that is more minimal and easy to create a template from. You can start off small and work your way up to freehand if you decide that you want to do something more intricate or complicated.
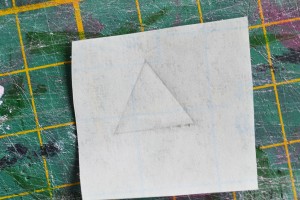
- Using your contact paper, cut out a piece slightly larger than you want your tattoo to be.
- Draw your tattoo on the contact paper with your pen
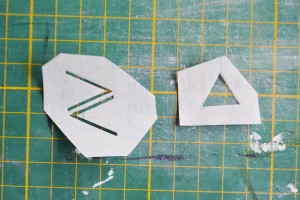
- With your contact paper on a rubber cutting mat, use your exacto knife to cut out the parts where you want ink to be.
- Clean the part of your body where you want your tattoo to go and pat dry
- Peel the contact paper off of the backing and apply it to your desired area. Try your best to make sure that you stick it down properly the first time.
- Put on your gloves and fill your tattoo in with a thick later of ink
- Keep the tattooed area still for about 45 minutes – 1 hour while it dries (possibly longer if it’s a larger area)
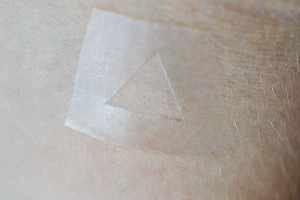
- When the ink is dry, peel off the ink and contact paper
- Your tattoo will appear very light at first, but darkens almost to black within about 12-24 hours.
Freehand Method:
- Decide on your design(s) and where you would like to place them.
- Clean the part of your body where you want your tattoo to go and pat dry
- Use a pen to draw the design on your body.
- Put your gloves on and begin to use the nozzle of the bottle to trace over your design.The thicker you make the lines, the darker they will come out. For the shading of my peony I made the lines very thin so that the ink actually came out lighter in colour, which I like.
- Play around with the different tones that you can make with the amount of ink that you use.
- Once you have finished your design, keep still and allow the tattoo to dry for about 45 minutes – 1 hour
- Peel the ink off and allow tattoo to full develop for 12-24 hours.
Results:
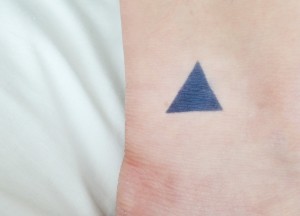
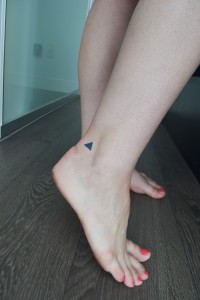
I started off with a tiny triangle on my right ankle.
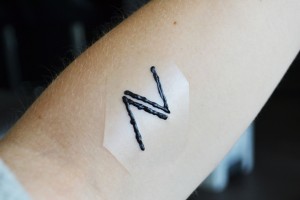
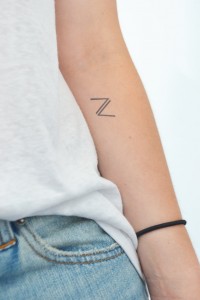
Then, I tried to recreate a geometry design that I had seen on Pinterest on my left forearm.
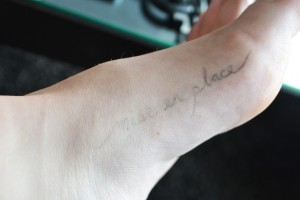
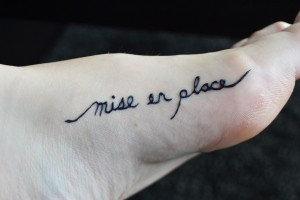
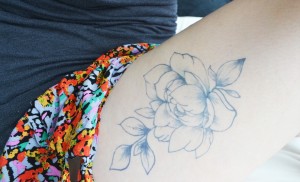
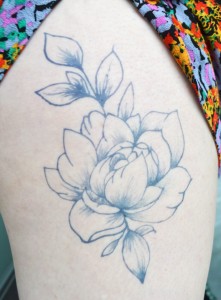
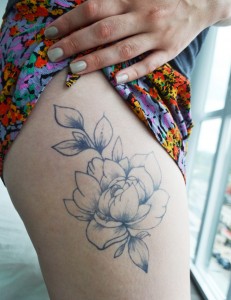
Inspired to try even more designs, I put the phrase “mise en place” on my foot and finished off with a peony on my thigh.
I’m actually really surprised at how well the peony came out and am seriously considering getting this as a tattoo in the future. In the coming weeks, I might even try some fun finger tattoos!
These would are great for a festival, summer beach day, or a vacation! Or if you’re like me, debating a tattoo idea – try a temporary tattoo first!
Would you try giving yourself temporary tattoos? If so, what would you pick? Let me know in the comments. ♥
Happy Tattooing!!
xo, tess.
Let’s Stay Friends!
Insta | Pinterest | Enews | TikTok