DIY
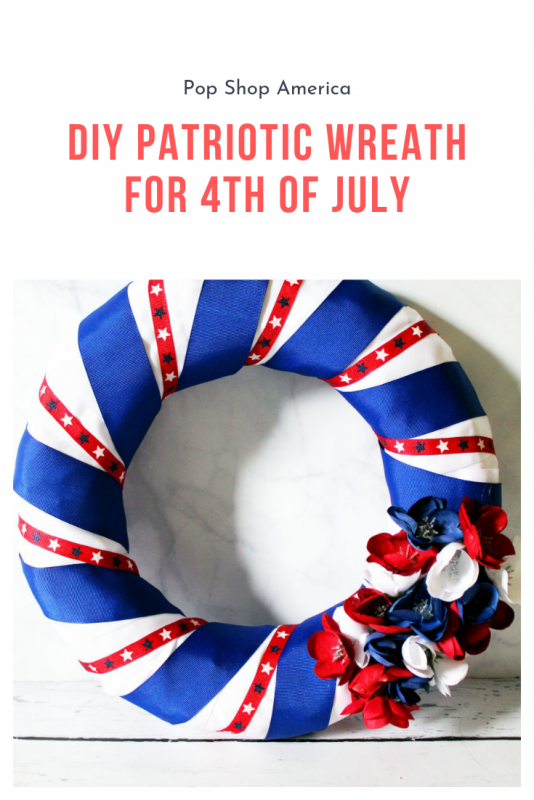
DIY Patriotic Wreath
Jun
I’ve got wreaths for my door for Fall, Halloween, Christmas, and Easter, but I don’t have anything for summer. So all summer long, one of two things happens: either (1) my door just stays empty and sad, or (2) more likely, the Easter wreath gets left up until September, when I can put up my Fall wreath.
And, inevitably, everyone who visits our house teases me about the pastel wreath with the adorable bunny on it. But not this year! This year, I decided I would make my own wreath for summer. And I knew that, if I could make it patriotic, I could display it all summer, from Memorial Day through the 4th of July.
After a quick trip to Michael’s for supplies, I made this gorgeous (and super easy!) wreath. And possibly the best part? The supplies totaled less than $15-score!
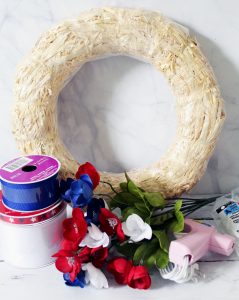
What You’ll Need to Make Your Patriotic Wreath
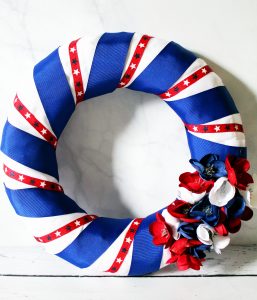
- a wreath frame (I used a straw one that only cost $2.50 without a coupon)
- 2″ or 2.5″ wide white ribbon
- 1.5″ navy blue ribbon
- 3/8″ patriotic or red ribbon
- red, white, blue flowers
- hot glue gun and glue sticks
- scissors
- wreath hanger
Note: I didn’t include lengths for any of the ribbons, because it depends on how big your wreath frame is. Mine was 10″ and I used at least 3 yards of white and blue, but less of the patriotic. I was able to buy just one roll of each, though.

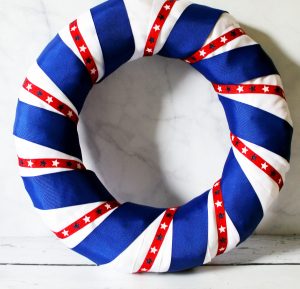
Wrapping the Patriotic Wreath
Plug in your glue gun and let it heat up. When it’s ready, unwind a long length of white ribbon. Hot glue the ribbon to the back of your wreath and then start wrapping the ribbon to cover the wreath.
I wrapped the white ribbon at a diagonal so it laid flat against the wreath. When you get back to where you started, cut your white ribbon and then hot glue the end to the back of the wreath.
To wrap the blue, unwind the roll of blue ribbon. Hot glue the end to the back of the wreath. I hot glued it on the seam of where two white ribbons overlapped so it would help cover the seams. As I wrapped, I kept the blue ribbon covering the white seams as best I could. Hot glue the end when you get back to where you started.
Lastly, unwind the roll of patriotic ribbon. Hot glue it to the back of the wreath in between two blue wraps. That way the patriotic ribbon will lay in between the blue as you wrap. Wrap the wreath with the patriotic ribbon and hot glue the end.
Adding the Flowers to Your Wreath
Once you’ve got all the ribbon wrapped, it’s time to add your flowers. Cut each flower from it’s stem; I cut it pretty close to the bottom of the flower.
Decide where the top of your wreath is. Use hot glue to glue each flower on to the bottom right diagonal of your wreath. Glue them close to each other (even a little on top of each other) so they look like a nice flower bunch.
Hanging Your Wreath
Cut a piece of ribbon (or twine if you’ve got it) and loop it. Glue the ends of the loop to the back of the top of your wreath. This will give you a loop to hang on the wreath hanger if you want.
If your wreath is skinny enough, it may just fit down in your wreath hanger (that’s how I hung mine at first). Either way works!
Other Ways to Personalize Your Wreath
- You could use a cute patriotic sign or patriotic pompoms or make your own paper flowers to decorate your wreath.
- You can use any combination of red/white/blue/patriotic ribbon you want – and you could add some sparkly paint or sequins too!
- Instead of white ribbon, you could use strips of white fabric for a less shiny look.
Like I said, the wreath doesn’t cost much to make, and it’s super easy! I was able to complete the whole thing, start to finish, and hang it up during my son’s nap time. And it’s brightened up my door so much! The wreath would also make a great hostess gift for a Memorial Day or 4th of July party!

Let’s Stay Friends!
Insta | Pinterest | Enews | TikTok